While the canister system is one of the simplest adhesive systems in the world, sometimes it gets presumed to be too simple and things get missed. Here's some of the common mistakes and what you can do to ensure it doesn't happen to you!
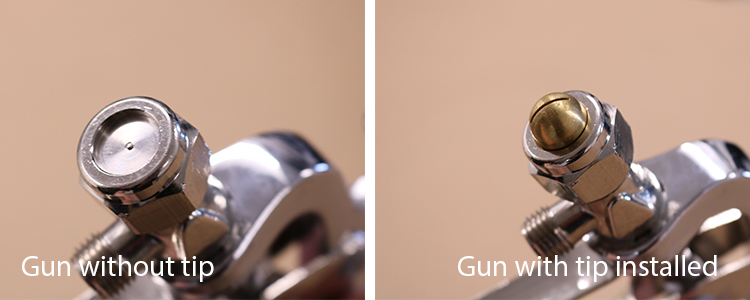
“Hosing” Spray, No Real Pattern
If your canister of adhesive is “hosing” glue out of the gun when you pull the trigger, it’s likely that there isn’t a spray tip, or nozzle, attached. Check the front end of your gun and ensure that you place a spray tip on the end. Tips, or nozzles, enhance the spray pattern while reducing the flow to a manageable amount.
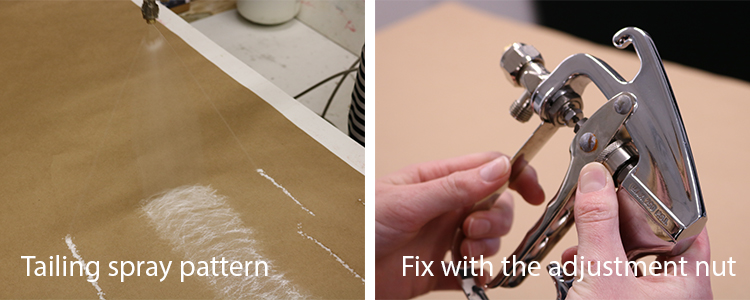
Spray Pattern with “Tails”
When you see a spray pattern where the glue is very heavy on the top and bottom and appears normal in the middle, this is called “tailing”. The problem is usually that there is too much adhesive flowing through the gun. This can be fixed by dialing down the flow. Find the adjustment nut (just behind the trigger) and move it forward, or tighten it.
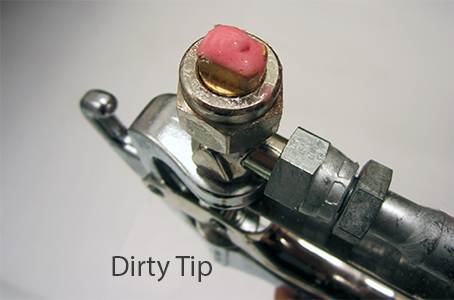
Uneven Spray Pattern
Is your canister of spray glue giving you a wildly uneven spray pattern? This is usually defined by random “feathering,” drips and heavy spots. Typically, uneven spray patterns can be solved by cleaning your tip. To do this, remove your tip from the front of the gun. Apply a mild solvent like TensorGrip S101 to the tip, let it soak, then rub it gently with a clean cloth. It should look sparkling clean. Check the orifice (hole) in the center of the tip too. If you can see buildup in this area, use a paperclip or something of a similar size to clear the tip. Alternatively, you can replace the tip with a new or clean one.
Sputtering Spray
Pppbbbbtppbbbbtttt. Are you hearing (approximately) that noise while spraying your canister of glue? If you are, here’s the likely reason why. Adhesive canisters, like some humans, don’t like cold weather or chilly concrete floors. If the air temperature is below 60°F (15°C), you’ll need to warm the canister. Here’s how we recommend doing that:
- For 22L (Large) or smaller canisters: immerse the canister in warm water for about 15 minutes. Remove and gently agitate to bring the glue back into solution.
- For 108L (Intermediate) or larger canisters: move the canister off of unheated concrete floors, into an area where the air temperature is above 60°F (15°C) until the temperature of the canister is at or above 60°F (15°C). To agitate the canister, lay it on its side and roll back and forth gently.
- Prevent it! Use a heated canister blanket to keep the container at a safe and reasonable temperature. Store your canisters off of the floor - like on pallet racking or on a cart. Contact us to see what’s available for your use.
![]()
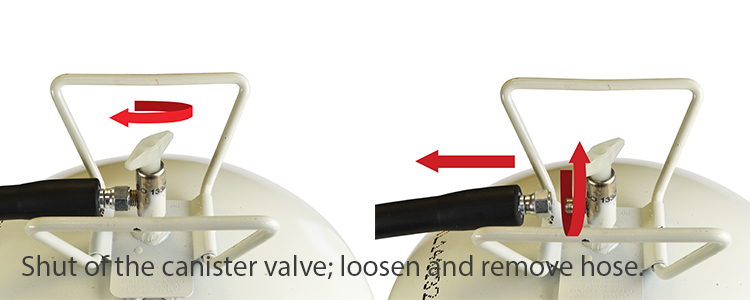
Little or No Adhesive Spraying
If very little or no adhesive is spraying when you pull the gun trigger, there are a couple things that could be wrong. Firstly, ensure that the canister valve is on. Turn the knob on the top of the canister to the left as far as it will go. If the problem persists, it’s likely that the hose is blocked. In this case, you will need to replace the hose. Shut the canister off (turn the valve on top of the canister all the way to the right) and remove the hose. Caution! If the hose is blocked, some pressure may be trapped inside. Be sure to protect yourself from spray as you remove the hose by using a rag to shield the pressure and wearing safety glasses. Replace with a new hose and reattach your gun. Turn the valve back on, and you should be good to go!
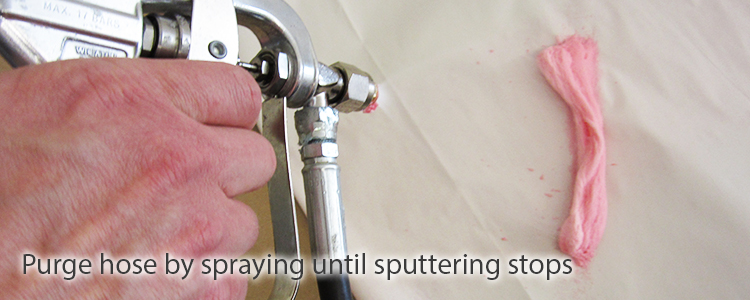
Low Flow, Bubbly or Irregular Delivery
If it seems like there’s not enough adhesive being delivered, or the spray pattern is irregular, bubbly or sputtery; check that the valve on both canister and gun are open. If they are open, it’s likely that the hose needs to be purged. Hold your gun over a waste container, large piece of paper or a scrap substrate and pull the trigger on the gun until the spray pattern appears normal (usually 30-45 seconds).
Poor Adhesion, Delamination, Peeling, or Bond Failure
It’s everyone’s worst fear – the bond not holding up. Thankfully, there are ways to prevent and troubleshoot it. Here is a list of questions to help troubleshoot the adhesion process and prevent bond failure in the future:
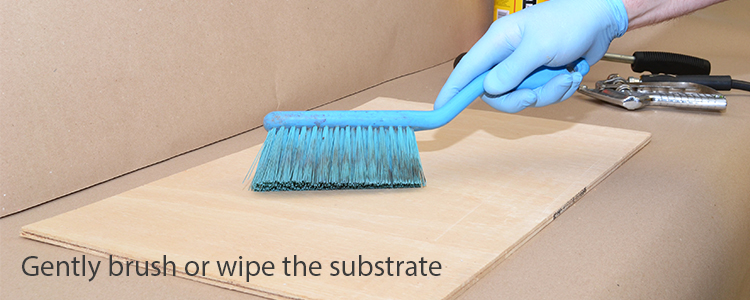
- Were the substrates clean and free of dust, dirt, oil and moisture? Gently brush the substrates with a hand brush or clean cloth before applying adhesive to remove all typical residue. Do not use oil-based cleaners.
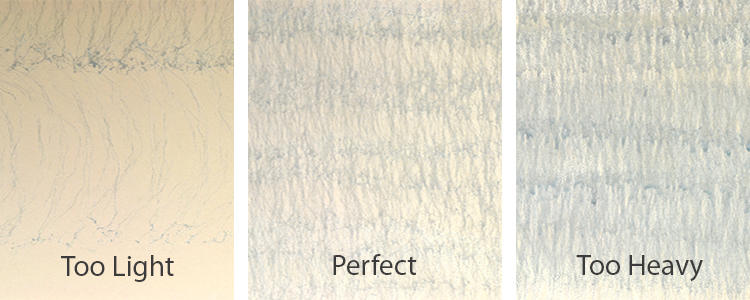
- Was there too much or too little adhesive applied? If the adhesive is applied too heavily, solvents and moisture may be trapped as the glue dries. If there is not enough coverage on the substrates, the bond will also fail. Typically, you should aim for 80% coverage; a little substrate showing, but no gaps and no puddles of glue. Check our spray manual to see the appropriate coverage for the product you’re using.
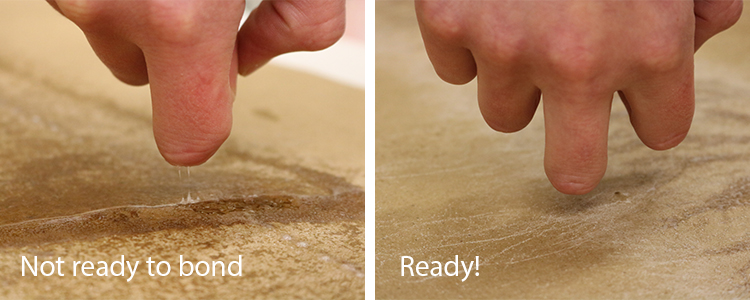
- Was the adhesive allowed to dry? Allow adhesive to flash off for at least 30 seconds; more if the humidity is high. Check dryness by gently tapping with your knuckle – if the glue doesn’t transfer to your knuckle in areas where the application heaviest, the substrates are ready to be put together.
- Was the adhesive left to dry too long? Contact adhesives don’t always have an indefinite open time, while most Pressure Sensitive adhesives (PSAs) normally do. Test the applied adhesive on both substrates before putting them together to ensure there is still sufficient tack left. If you don’t feel any tack, re-apply a coat of adhesive to both substrates and allow to dry, but not longer than 15 minutes. Keep your eye on the substrates and the clock!
Leaking Gun/Gun Won’t Shut Off
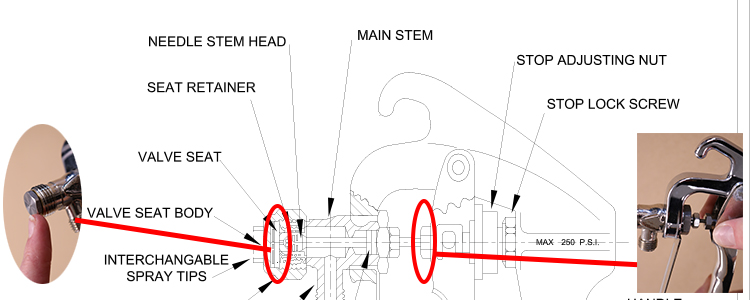
Is your spray gun dribbling? If so, here’s the first thing to check: there is a little nut in front of the adjustment nut which often gets accidentally run forward. Twist this back and check again. Fixed? If not, do you remember seeing a flat piece of metal under where the tip is? This is called the valve seat. If this is removed or loose, the gun will drip glue. To fix this, shut the valve of the canister off, empty the hose by holding the trigger until glue stops flowing and remove the nut on the front of the gun. Remove the tip and tighten the valve seat (or replace if missing). Put the tip and nut back on, tighten and open the canister valve again. You’re all set!
Additional questions? Still not fixed?
Contact us! Or chat with us from every screen, on the right side.